

Early Season Pre-ride Checklist
So you picked up a new mountain bike from Basalt Bikes or brought an old bike in for a full factory overhaul. We wish we could tell you to set it and forget it and ride it hard until your next service is due. However, bikes are complicated machines with lots of moving parts, used on rough trails and roads that can rattle even the tightest bolt out of a frame.
It used to take mistake after mistake to learn what to do and what to check before a ride. Maybe your rear axle loosened and you didn't realize it until the bike was shifting poorly because the wheel was at an angle. Maybe it was a suspension pivot that came so loose it wore against your frame, causing a creak every time the bike flexed. Sound unlikely? It has happened to us! If you know what to watch for, you can catch these issues before damaging your bike or causing a crash. Our lead mechanics have put together a checklist to set you up for your next successful ride.
Part 1: Wheel, Tires, Thru-Axles
Wheels and tires are the only part of your bike that have direct contact with the terrain you ride on, so it’s safe to say they’re some of the more important parts of the bike. When it comes to your wheels, here’s what to check:
Tire pressure
Check your tire pressure before every ride! Tubeless systems are by no means perfect and losing a few pounds of pressure in between rides is to be expected. The same can be said for tubes. Riding with too little tire pressure can result in rollover flats, burping, or pinch flats, and riding with too much pressure can decrease traction efficiency.
Spoke tension
Go through the spokes on each side of the wheel in pairs by lightly squeezing with your hands. They may vary a bit in tension but what you’re really looking for is any spoke that’s abnormally loose or broken. It will be obvious if a spoke is super loose or broken. If you find one, don’t ride on your wheel; it could damage your rims. Bring it into a shop as soon as possible so you can be back on your bike in no time.
Thru-Axle/Quick Release
Your thru-axle or quick release attachment is the part that connects the hubs of your wheels to the frame or fork. Check that it is tight before each ride.Thru-axles may be lever actuated, or you will need a 5,6 or 8mm hex key to turn it.
Rotor Bolts
Your rotor bolts are what connect your rotor disc to your hub. Check that they are snug, usually with a T25 bit.
Sealant
At least once a season, check your sealant levels and refresh(directions for number of ounces per tire size are listed on sealant bottles). Sealant tends to dry up over time and the less there is in a tire, the less it can do its job.
Part 2: Drivetrain
Cranks/Pedals
To check your cranks, move them back and forth and side to side. If you notice a lot of play, especially side to side, bring them into a shop. Crank systems vary and are often more complicated than just tightening a bolt. Also, check that your pedals are tight. Most modern pedals are a 6 or 8mm hex key on the opposite side of the crank from the platform of the pedal.

Chain
Always make sure your chain is lubricated. If you are in a dry area, use a dry lubricant, which will need to be applied before each ride or every other ride. If you are in a wetter area, use a wet lube, which will last roughly 5 rides. When in doubt, if the chain feels dry, lube it.
Derailleur Hanger
Your derailleur hanger is the piece that attaches your derailleur to your frame. It should be relatively straight and in line with the cogs. A bent derailleur hanger will affect your shifting and most likely be the culprit if you have issues shifting.
Clutch
If you have a clutched derailleur, which most modern systems do, make sure the clutch is active (switched in the ‘on’ positions) before riding. If you haven’t taken the rear wheel off recently, it is likely already active.
Derailleur Mounting Bolt
Your derailleur mounting bolt is the bolt that goes through your derailleur and threads into the hanger. Make sure it’s tight. A loose bolt will affect shifting and due to the constant pressure being applied to it, it has the propensity to loosen up.
Part 3: Frame
On a full suspension bike, your frame and bars have a lot of moving parts. Less so on a hardtail, but they still need to be checked regularly.
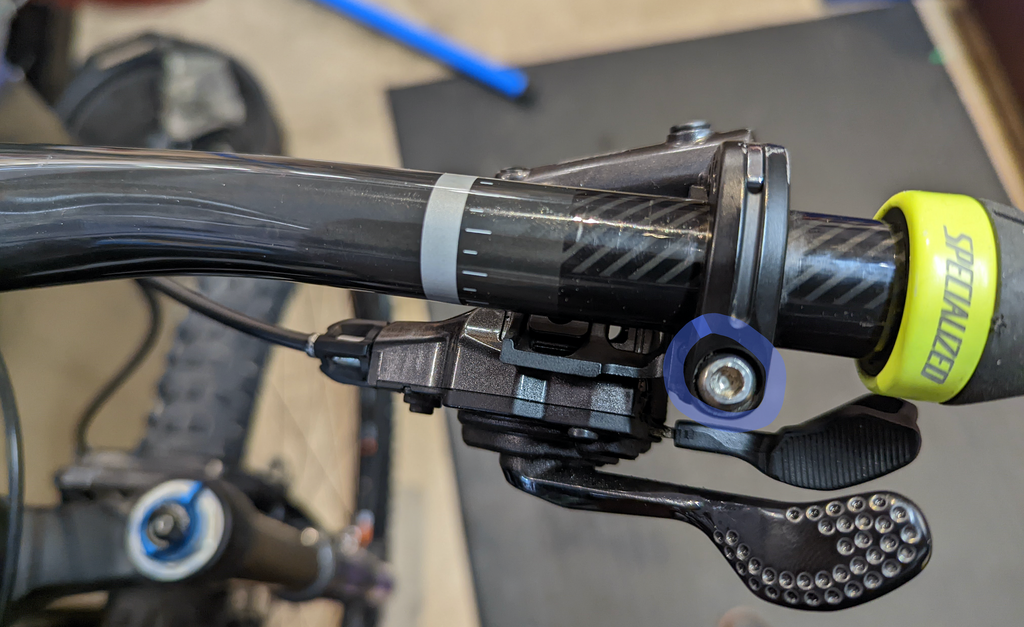
Shifter/Brake Lever mounting bolts
Your shifter and brake levers are attached to your bars by mounting hardware with pinch bolts. These bolts have a lower torque spec (usually about 6Nm); get them snug so there is no movement, but try not to over tighten them especially on carbon fiber bars, which can crack under too much pressure.
Be extra careful with dropper lever bolts; the torque spec for them is especially low (about 2.5Nm). These bolts are usually 4, or 5mm hex heads, or T25s and dropper lever mounting bolts tend to be even smaller at around 2-3mm hex heads. A good rule of thumb: how tight a bolt needs to be is generally proportional to the size of the bolt head.
Stem Faceplate Bolts
The faceplate of your stem is what holds your bars in place. If they’re loose, it can cause your bars to shift under force. These are also usually a lower torque spec, so be careful of overtightening, especially if you have carbon bars. These are usually 3-5mm hex heads, or T25s.
Stem Steertube Bolts
These bolts keep your stem attached to the fork through the steertube. The steer tube is very strong so you can generally tighten these as much as you want. These are usually 4mm hex bolts.

Linkage Bolts
These bolts connect your rear shock and the front and rear triangle of the bike. The constant activity of your suspension makes these particularly prone to loosening up over time. The majority of these bolts are and vary not only from brand to brand, but from model to model. Don’t lose them! They can be hard to replace. Check these bolts frequently to make sure they are nice and snug.
Caliper Mounting Bolts
These bolts connect your disc brake calipers to the frame and fork; if they fall out, it’s no more brakes for you. There are two bolts on each caliper located at the front and rear of the caliper. These have a pretty high torque rating, so snug them up.
Seatpost Clamp Bolt
This bolt holds your seat post in place, but over tightening can cause your dropper post to work incorrectly. Make sure it’s snug, but if your dropper is sticky on the way down or up, relieving some pressure on the bolt could be an easy fix and usually requires a 4mm or 5mm hex.
Saddle Mounting Bolts
These bolts (there are generally two) hold your saddle onto your seatpost and control the lean of your seat, allowing you to adjust the angle of your seat post by tightening one bolt and loosening the other. These bolts can be snugged as tight as you want to prevent your saddle from moving around, usually with a 4mm, 5mm, or T25.

Part 4: Suspension
There are a lot of adjustments you can make to dial your front and rear suspension. Here, we’re only going to focus on things to look out for to avoid using your fork or shock incorrectly.
Initial Setup
The first few rides you take on a new bike are the ideal time to set up your suspension. Most modern forks and shocks have an air chamber that will have air pressure proportional to your body weight and riding style. Many forks have a weight and psi chart printed on them, and many rear shocks have indicator levels on them. If your system has neither, check the manufacturer website for guidance.
Once you figure out what fork and shock pressure works for you, remember it so you can periodically check to be sure it’s set to your preferences. Forks and shocks do not loose pressure frequently, so if you find yourself constantly having to add pressure to the system, take your bike to a service shop. There’s a good chance you have an issue with your fork or shock.
Sag Meter
This is typically a black rubber ring that lives on your stanchion and moves up and down it. To help you figure out what pressure works best for you, set your sag meter before every ride, especially on a new bike. It will also tell you if you need more or less pressure in the system. To do this, set your sag meter closest to the seal on your fork and shock so that as you travel through your suspension the ring will move up the stanchion.
At the end of your ride, check your sag meter. You want it to be near the end of the stroke without bottoming out. If it is all the way to the top of your fork, or bottom of your shock, that means that you were bottoming out your suspension, so you’ll need to add air pressure to the system. Conversely, if it is still near the middle of the stanchion, it means that you weren’t taking advantage of all of your suspension and you should let out some air. At the end of a hard ride your sag ring should look something like this.

Once your pressure is set to your preferences, you shouldn’t have to mess with your pressure much. Every so often, though, it’s a good idea to reset the sag meter before a ride, especially if you’re starting to ride more aggressively, or on more aggressive terrain.
Excessive oil
Check around your suspension seals every so often and make sure there is no excessive oil around the seals or on the stanchion. A little bit of oil is fairly normal, but a lot could mean that you need to change out your seals and oil.
Oil/Seal Change Intervals
Most major suspension companies recommend getting a service to change the seals and oil in your fork and shock every 50 hours of riding. This service will also help with breakaway force, and increase the performance of your suspension.
Recap and Printable Pre-Ride Checklist
There you have it! As you can see, 90% of the checks you should make are for bolts that tend to loosen over time. Ideally, it’s a good idea to go through this checklist before every ride, but realistically if you are doing most of this every three to five rides, you should be able to avoid major issues on the trail. Once you’re in the habit of running through your bike, this list should take no more than five minutes with the help of a multitool and bike pump. For anything you are tightening, just make sure they are snug and not moving, if you want an exact torque spec refer to your frame manufacturer.
If you have questions about your pre-ride checklist, or any other bike service needs, we’re always here at Basalt Bikes. To sum it up in a quick list, here’s the basic rundown:
- Tire pressure
- Spoke tension
- Thru-axle/Quick release check
- Rotor Bolt check
- Sealant
- Crank/pedal check
- Chain lube check
- Derailleur hanger check
- Clutch
- Derailleur mounting bolt check
- Shift/brake lever mounting bolt check
- Stem faceplate bolt check
- Stem steertube bolt check
- Linkage bolt check
- Caliper mounting bolt check
- Seatpost clamp bolt check
- Saddle mounting bolt check
- Suspension